Step-By-Step Guide To Create A GitHub App
Published on 29 Aug 2019

Step-By-Step Guide To Create A GitHub App
Github Apps are a great way to improve our workflow. They allow us to automate our project workflows and improve the code quality. Github marketplace serves more than 100,000 users and offers almost 50 tools. There are numerous apps already present in the Github marketplace. Github apps are also a secure and safe way to allow access to our repository. These apps allow us to add actions in our CI/CD flows like code reviews, PR action, format checks, etc.
In this article, we’ll take a look at how we can build our own Github app, allowing us to integrate custom actions into our workflow. We’ll build our app using Node JS as the platform.
Tech Stack and Pre-Requisites
- Github Account – to register the app
- Node JS (>= 8.3.0) – to build our app
- Probot – Node JS framework for building Github apps
- Heroku – for hosting the app (there is no restriction on which hosting provider to use.
Before we can start implementing our workflow, we need to create an app on Github. This app will enable us to acquire different permissions, receive webhooks for event (actions) happening on a repository and perform some actions on them among other things.
The simplest way to create a Github app is to go to Github itself –
- Go to the ‘Settings’ page of our profile.
- Go to ‘Developer Setting’ from the left menu.
- Click on the ‘New Github App’ button.
But since we are using Probot as our framework for building the app, we’ll use its command-line tool to create and register the app on Github.
Create Github App Using Probot
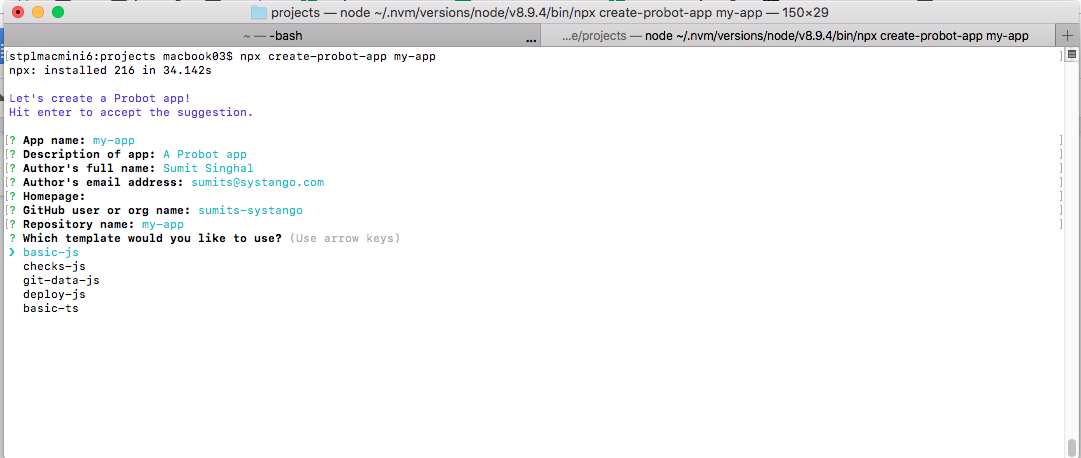
The following steps assume that we have node js installed and the version is 8.3.0 or later. Run the following command in the command prompt:
- npx create-probot-app <App name>
- Please note that the app name should be unique across the Github, so you might not get the name you wanted at first!
- Above command will walk you through the details required for the app, like app description.
- The result of this command would be a node js project with structured code and dependencies in place.
- The project also contains a skeleton code to capture one event. The event is for issue creation on Github repository (more on events later). And as part of the action on that event, a comment gets added.
- Now that we have the project ready, let’s register this app on Github.
- Run the project using the following command:
- npm start
- Now go to your web browser and open the link: ‘http://localhost:3000’
- Click on the ‘Register Github App’ button on this page. This will show a new page.
- Enter your GitHub account’s credentials.
- Now a new page will open up. Enter your Github app name and click on the create Github app button.
- Next up is selecting the repository to install the app into. On the next page, there will be a list of repositories. Select one to test the app.
- Make a note of .env file generated in the application code. This would be needed when we host the application.

Managing Webhooks
One important aspect of Github Apps is webhooks. We need to set up the webhook to receive the events from our repository. We need two things for our webhook to work:
- Webhook URL – where our app is running
- Webhook secret – for security reasons
When we created our app in the previous step, probot created and added a public webhook URL and secret to our repository. This webhook allows us to test our before we procure a cloud instance and host our app.
To update these values, we can go to the settings page (detailed below). The URL would be https://github.com/settings/apps/<App Name>.

Managing the Events via Webhooks
Once our app is created and registered on Github, we are eligible to receive events, in the form of webhooks, for certain actions happening on any repository. As we saw in the steps above, while registering the app itself, we can install it into our repositories. But if we want to test the app in additional or other repositories, we can do so using the app’s public link. Let’s take a look at the steps:
- Go to app’s Github page:
The URL would be of the format – https://github.com/apps/<App Name> - There would be an option to install/configure the app.
- Once we start the process, we could see a list of repositories to select from.
The app we generated using probot would have built a skeleton webhook for capturing one event and the actions to be taken on this event. This sample would help us to understand the flow and build our own.
To go through the sample, open index.js file at the root of the project. Here, we see the code for handling the event issues.opened. This event lets us perform an action whenever an issue is created in the repository.
Similarly, we can capture as many events as we need. These events also bring some context with them, which can be used to extract data related to the event. For example, for issues.opened event, we can get the issue id. These details help us to perform our action, like commenting on the issue in this case.
Here is the full list of events we can capture.
Testing the App
Now that we have our app setup and we have an understanding of the events, let’s test our app locally. Since we already have one event captured in our app, we will use the same to test the app.
- Make sure the app is running locally
- Go to the repository which has the app installed
- Create an issue
- Once we create the issue, the event should be triggered and captured by our app.
- As per the implementation, a comment should be added to the issue saying – ‘Thanks for opening this issue!’
If you see the comment, the app is set up properly and we can start building the workflow of our choice.
Managing the Permissions
There would be some actions for which we would need to ask for certain permissions from the repository owner. For example, if our workflow requires us to check the code for linting, we would need appropriate permission, like read/write access to code.
As we build and test the app, we would keep on recognising these permissions. But how do we get those permissions into our app?
There is a settings page for our apps where Github allows us to set the permissions required by the app. Whenever a user would install our app, they would be asked to grant these permissions to the app.
To access this settings page –
- Go to the settings page of the profile
- Look for ‘Developer Settings’ option.
- Under this, there is a ‘Github Apps’ link.
- This link will show all the apps that belong to us.
- Click on ‘Edit’ in front of the app name.
- Go to ‘Permissions and Event’ to edit the permissions.

Here is the list of all the permissions.
Configuring the app
We just saw how to configure the permissions required by the app. But this is not the only configuration required by the app. The other settings include things like:
- App name (yes, we can still change the name if we need to)
- App description
- App’s public home page
- App’s setup URL
There are a few other settings. Check these at – https://github.com/settings/apps/<App Name>

Hosting
We have looked at developing the app, registering on Github, configuring the app and the permissions required. Now we need to host our app so that we can go live with it and offer it to other people for use.
Remember that the app works on the basis of events generated from the Github repository. These are to be captured by our webhook. And to do that, we need to host our app. For this article, we’ll host the app on Heroku. It provides us an easy way to deploy and host our Node JS application. And since we don’t need any database (yet), we can try the hosting for free.
Look at this tutorial on how to deploy a Node JS app on Heorku if you have not done this before.
Once the app is up and running on Heroku:
- Update the environment variables.
- Generate a webhook secret and add it to environment variables.
- Update webhook URL and secret in Github app configuration.
- The webhook URL should be the base URL of the newly deployed Heroku app.
Installation
Once we have hosted our app, we can distribute the app or use it in our project repositories. Please note, that we have not published the app yet, which means that we would have to distribute the app manually. To distribute the app, provide the URL of the app which would look like:
https://github.com/apps/<App Name>
Once a user visits this page, with Github logged in, they would be given an option to install the app. Just click on that button and follow along to configure the app for the repositories.
Listing on Github Marketplace and Review
We are now ready to publish our app on Github Marketplace. It’s important to publish the app to distribute it amongst the Github users. Once the app is available on the marketplace, users can just search the app and install it into their repositories.
Publishing the app requires us to fill certain details about the app, like the description (short and detailed), app logo, contact page etc. Just follow through the marketplace publish link present on the settings page of the app.
There are two ways to publish:
- With Github review
- Without Github review
If we go with Github review, the first thing we need to achieve is 100 installations. These could be through manual distribution, or by publishing the app without review. Post that, we would be able to ask Github for review of our app. Read these guides to make sure Github rules are followed and review goes smoothly.
 Once published, you can search the app on the marketplace.
Summary
Creating and publishing an app of Github requires a number of steps. These steps have to be performed in their specific required order. And this might seem a complex task at first. But when we start doing it, we realise that it’s as simple (or complex) as any other Node JS backend app. We need to capture the events with the webhooks, which are similar to writing the APIs. We then need to register the app with some simple steps and that’s it.
Our team at Systango has already built a number of applications on Github from the ground up and helped improve workflows drastically. We are a UK based digital product development agency that can help you not just with Github apps but tech consulting, web & app development on various technologies. With an experience of working on 300+ projects, we are equipped & excited for our next one with you.
If you wish to ease up your productivity and scale up your workflows with Github Apps hire tech experts at Systango. Contact us to know more.
Related posts
App Development
Mobile Apps
Technology
Web Apps
Building Your App? Rust vs Go: A Guide for Business Owners
21 Feb 2024
Blockchain
News
NFT
Software Development
Technology
Web 3
How Systango Pioneered USA's 1st NFT Ticketing Marketplace for Veraticket?
01 Feb 2024
Let’s talk, no strings attached.