

React JS – To Infinity & Beyond
Last Updated on: July 22, 2020

Getting Started with React JS
Our development team began using React JS when our Junction client had an interesting requirement: a real-time building intelligence system that would continuously track and monitor environmental variables typically measured by a junction box, such as light, temperature, humidity, flooding, air quality, noise and more).
With this in mind, we elected to design a dashboard which continually updated the data, and interpretations as soon as it receives updates from the backend. This needed to be done without completely refreshing the entire dashboard view. Being that it’s a real-time system that’s constantly generating alerts and data, refreshing the whole dashboard would be unnecessarily slow and cumbersome.
As a result, we looked to React JS as a way to to refresh only the portions of the dashboard that needed it. You may have seen React in use in Facebook’s timeline, notifications and messages. What’s more, React’s virtual DOM is simpler from a programming perspective to make Javascript reactive. We write pure Javascript that updates the React components, and React updates the virtual DOM for us.
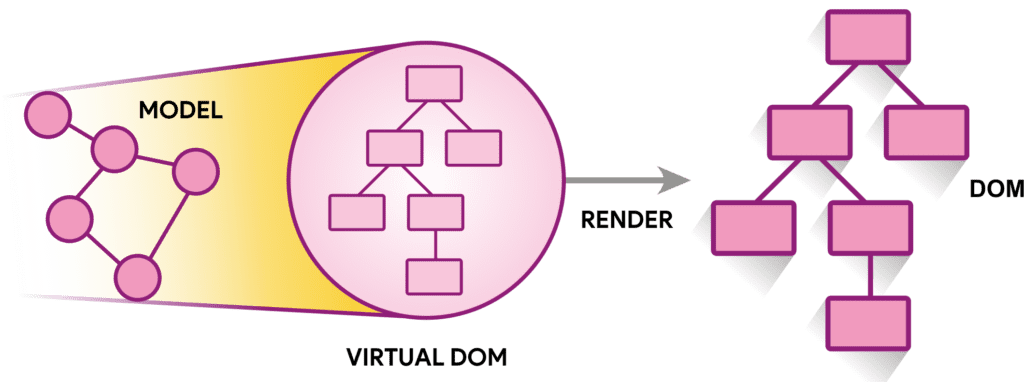
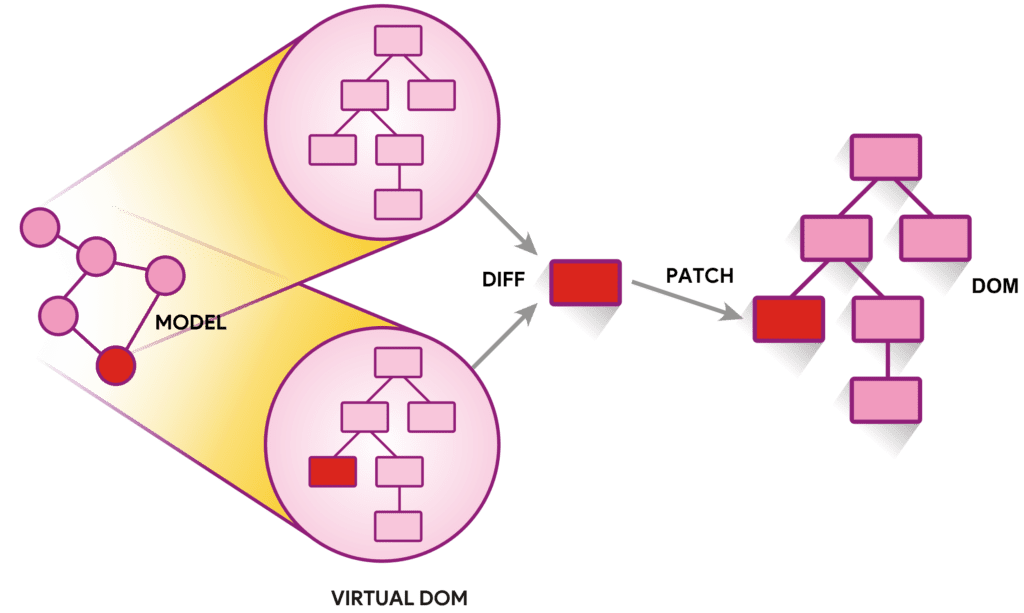
Like the actual DOM, React’s Virtual DOM is a node tree that lists elements and their attributes and content as objects and properties. React’s render() method creates a node tree from React components and updates this tree in response to mutations in the data model, caused by actions & results in a view with updated DOM elements in the node tree.
But even beyond this, there were still other reasons we ultimately chose React for this project:
I. Simplicity: Since our UI changes automatically even with significant changes in the underlying data, it’s a testament to the ease of use of React.js
II. Building reusable contents: With React.JS, we have the opportunity to build reusable contents. With encapsulated components, code testing, reuse, and concern separations become easier than ever.
III. Declarative: With significant changes in data, selected parts of our User Interface will get updated automatically. No need for additional functions.
How Does React Work?
From a UI perspective, React is a big deal. And it’s generating a lot of discussion among developers and UI experts alike. SItting down and actually learning React can feel like a chore, however. But get over that initial hump and things become much more interesting.
Once you get to know the data flow via state and props (React’s way of managing data flow within the DOM), you’ll see that the data that exists as state in parent component(root), flows in one direction to child components (leaf nodes) via props.
5 Main React Concepts You Should Know
There are five main concepts to understanding how React works that every serious developer should know. Understanding these will make learning React go much more smoothly for you. They are:
I. Components
II. JSX
III. Props & State
IV. React Lifecycle Methods/API’s
V. How Components Role Work
Concept #1 Components
React is all about components. React’s codebase is basically just one large pile of big components that call smaller components. In practice, the most common way to write React components is as an ES6 class containing a render method that returns HTML.
class DemoComponent extends React.Component {
 render() {
	return <p>Hello World!<p>;
	}
}
Concept #2: How JSX Works
As we can see, the component approach means that both HTML and JavaScript code live in the same file. React’s secret weapon to achieve this unholy alliance is the JSX language (where “X” stands for “XML”).
class DemoComponent extends React.Component {
	render() {
	  return <p>Hello {this.props.someVar ?  'Hello' : 'World'}</p>;
	}
}
Concept #3: How Props & State Work
Maybe you’ve been wondering where the this.props.someVar variable above is coming from.
If you’ve ever written a line of HTML, you’re probably familiar with HTML attributes like the <a> tag’s href. In React, attributes are known as props (short for “properties”). Props are how React components talk to each other.
class ParentComponent extends React.Component {
 render() {
   return <ChildComponent message="Hello World"/>;
 }
}
class ChildComponent extends React.Component {
 render() {
   return <p>And then I said, “{this.props.message}”</p>;
 }
}
Because of this, React’s data flow is unidirectional: data can only go from parent components to their children, not the other way around.
Sometimes though, a component needs to react to data that doesn’t come from a parent component (such as user input for example). And this is where the state comes in.
A good metaphor to understand the difference between props and state would be the Sketch Tablet. Unlike things like the body color and dial position of the Sketch tablet (props), the drawing itself (state) is not an inherent property of the Sketch Tablet. It’s just the temporary result of user input.
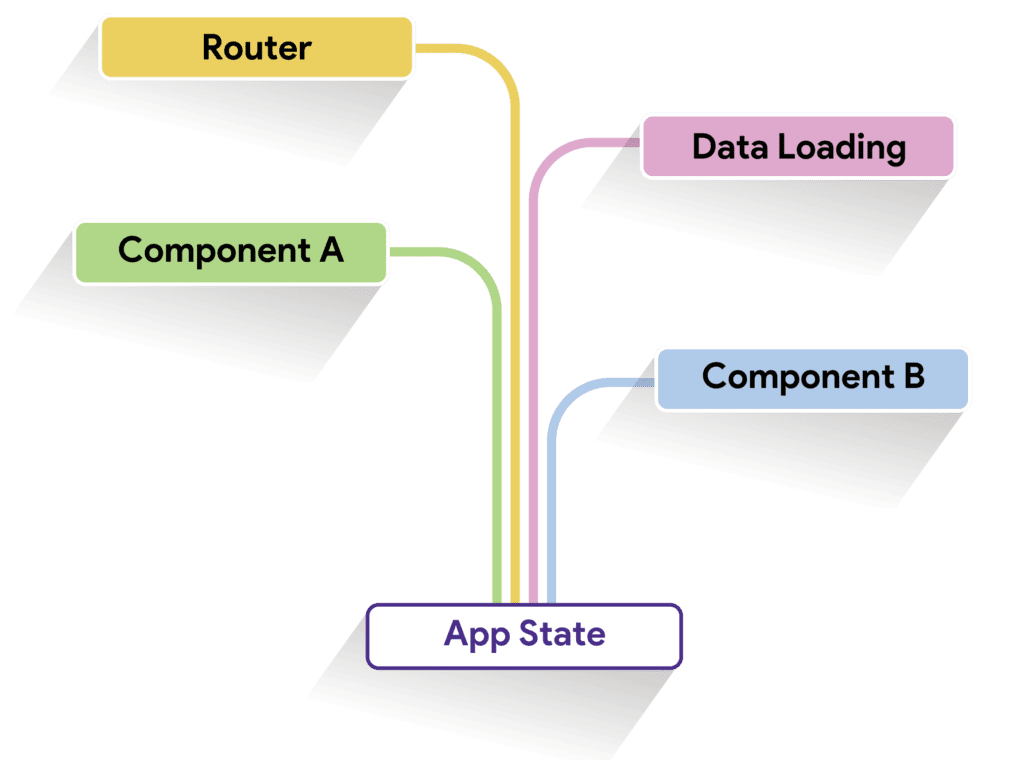
Note that a component’s state can also be passed on to its own children as a prop. We can think of this as a big river flowing downhill, with the router, data layer, and various components each adding their own little stream of data to form the main app state.
Inside a component, state is managed using the setState function, which is often called inside an event handler:
class DemoComponent extends React.Component {
 handleClick = (e) => {
   this.setState({clicked: true});
 }
 render() {
   return <a href="#" onClick={this.handleClick}>Click me</a>;
 }
}
In practice, the vast majority of data in a React app will be a prop. It’s only when we need to accept user input that we’ll use state to handle the change.
Concept #4: Lifecycle Methods
Everything in this universe has a lifecycle. It means everything is constantly changing over time. From the moment we’re born – we start changing – we’re getting older. We divide our life into parts that we call life stages.
Our React.js components are no exception – they too have a lifecycle. They go through stages that are called phases in React terminology. Those phases are:
#1 Mounting
#2 Updating
#3 Unmounting
From the moment our component is born – when it’s initially being rendered – it enters the Mounting Phase. Once our component is living a happy life and is being updated it enters the Updating Phase. Finally when it’s time to end it’s life it enters the Unmounting Phase.
Mounting:
These methods are called when an instance of a component is being created and inserted into the DOM:
constructor()
componentWillMount()
render()
componentDidMount()
Updating:
An update can be caused by changes to props or state. These methods are called when a component is being re-rendered:
componentWillReceiveProps()
shouldComponentUpdate()
componentWillUpdate()
render()
componentDidUpdate()
Unmounting:
This method is called when a component is being removed from the DOM:
componentWillUnmount()
Other APIs
Each component also provides some other APIs:
setState()
forceUpdate()
Concept #5: How Component Roles Work
After using React for a while, people started seeing two distinct “flavors” of code appear in their components:
One flavor is concerned with UI logic such as showing and hiding things. The other flavor is about data logic, such as loading information from your server.
This led to the distinction between container and presentational components (also sometimes known as “smart” and “dumb” components). Container components should handle your data, but — and this is the important part — not your UI. Presentational components are just the opposite.
In other words, in the classic to-do list example, one component will load the data, and then pass that data onto a different component that will be in charge of outputting the actual HTML markup and handling local state changes.
Our React Projects Voyage So Far:
#1. Junction:
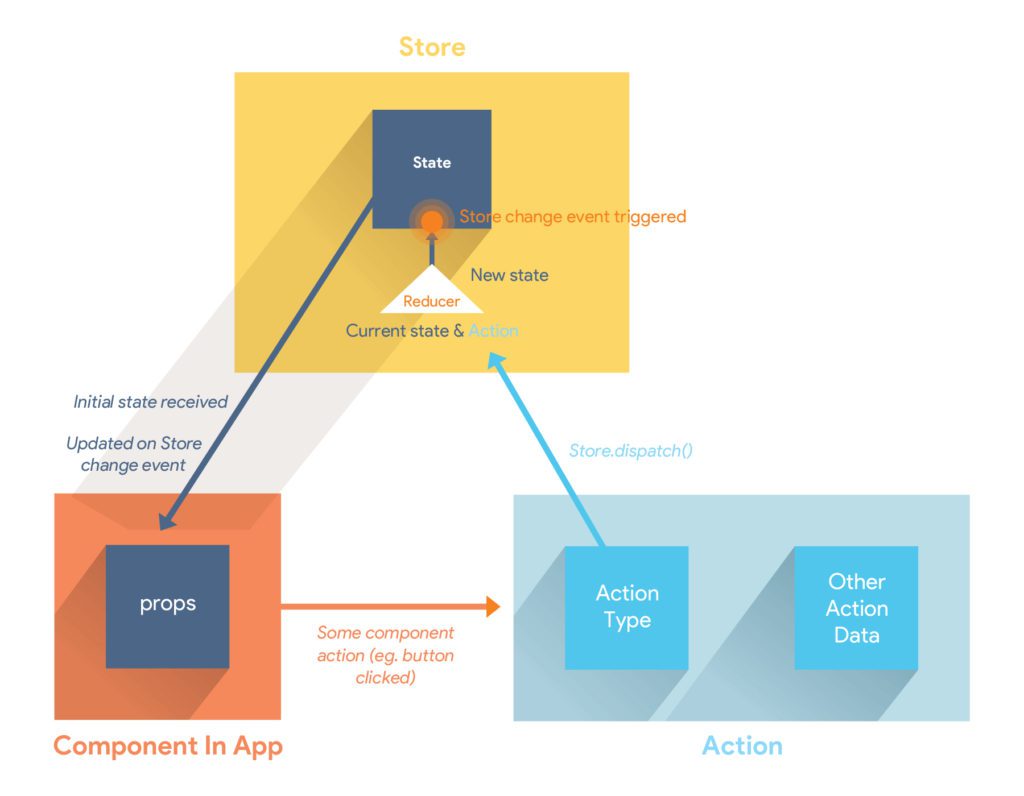
As we discussed above, this was our first project where we got our hands on React along with a wonderful state management library called Redux. The React Redux duo works pretty well. We have even created a free starter kit to help you get the most out of this robust system React is used by industry giants like AirBnB, Imgur, Wallmart, SeatGeek, HelloSign, etc.
As React should only deal with rendering the UI given a particular set of data i.e. if the data changes, it should re-render to form a new UI.
But using React Redux was not without its challenges. As our application grew, we started sprinkling state and business logic all over the place with no rhyme or reason. This was making it more difficult to reuse components and making them really thick.
Although Redux tries to separate the application data and business logic into its own container so React can manage the view, it can end up being disorganized. We kept encountering this pattern again and again, so we wondered if it would better to move all of the component states to the top of the hierarchy and just pass a particular piece of the state to whatever downstream component needed it.
We thought this would be useful since, aside from the topmost component, every other downstream component could be stateless. Since we used Redux Forms, this option would let us create multiple dynamic forms very quickly:
We then added ReactFire (Firebase Library for ReactJS) to the project when there came a time to let the Junction dashboard display data from Nest devices as well. Firebase is like a big database in the sky — you send requests to add/update/remove via the Firebase SDK that runs in the browser and listen for changes in the data and take action when that data changes. This option allowed us to attract a great deal of Nest users to Junction.
We then added other user-friendly features like React Highcharts, Twilio, Honeybadger and other tools to help round out the project and add to its appeal.
#2. TaxShield:
With this U.S. tax return software, our client wanted a real-time call analytics dashboard that can be analyzed to determine the best ad spend for customers most likely to take advantage of the offer. We used React and Firebase (ReactFire) since the client wanted to have real-time data and updates without delay.
With this service, any customer can check call records, audio, status and call source right from their dashboard. With these statistics, our client was able to invest in advertisements that used only the most relevant sources – such as web, television, facebook and radio. We used the React-Chart JS library to generate the real-time statistics and graphs of the call analytics for a more visually attractive and easy to understand result.
#3. PeopleTicker:
PeopleTicker is a salary benchmarking tool that verifies salaries and contract rates in various industries. We used React for this tool along with the conventional flux pattern originally designed for Facebook. Rather than use a single source of global storage accessible from anywhere within the application (like Redux), we ultimately used a Flux pattern state that has multiple storage points within the application.
Over time, we took on new projects which used React to a greater or lesser degree. We love the simplicity and ease of use that React + Flux, React + Redux and React + Mobx deliver. Together with different module bundlers like webpack and browserify, we were able to build more dynamic results for our customers. With these best-of-breed tools, we created a free starter kit that lets anyone new to React get started using this innovative new suite of tools very quickly.
Try it out and see for yourself!
If you are seeking to hire React JS developers to help you with your next project, do connect with our team here.


pretty apt blog 🙂
Thanks a lot 🙂
It makes me even more curious. Wonderful insights here at you blog. Very informative post.
Nice collaboration, keep it up.
Looking for Tips for Cloud Application development
Glad to know 🙂 Thanks for your appreciation.
Nice blog ?
Thanks Asad
Fantastic blog! Thanks for sharing very interesting post, I appreciate to blogger for amazing post.
Thanks a lot
Great post! Thanks for sharing very powerful post, It’s very helpful. Keep it up.
Thanks for sharing the valuable information about the React JS. This is very helpful to me and at the same this is very useful concept for everyone. For your kind information we are providing React Js Training in Hyderabad by real time industrial experts. Interested persons can enroll here: https://goo.gl/forms/QpPSouyOw0s6Crnr2
Thanks a lot for your appreciations ?
Informative blog. Thank you for sharing with us..
Nice information! Thanks for sharing this great article by using your valuable time. Really it is very useful for all. Keep it up.