

Free React-Redux Starter Kit
Last Updated on: July 22, 2020
When we first started using React-Redux, it was impossible to get a firm foundation and understanding of which part of React-Redux to build first, or the general approach to building React-Redux apps. In short, there was no starter kit or blog post walking you through the steps of creating a React-Redux project with eslint, webpack, babel, API middleware, http middleware configurations and mocha.
In other words – a one-shot approach.
So since such a starter kit didn’t exist, we decided to make one ourselves and share it with you!
What is Redux?
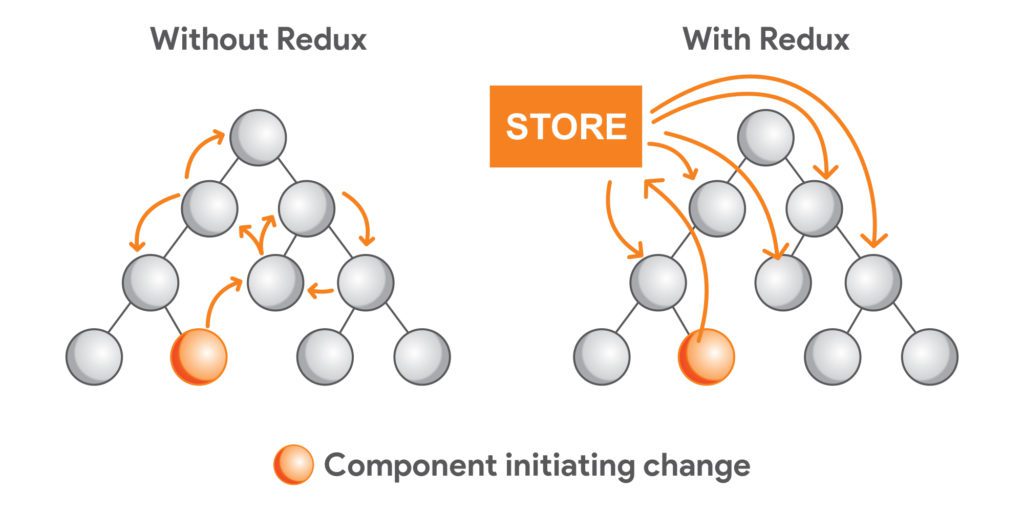
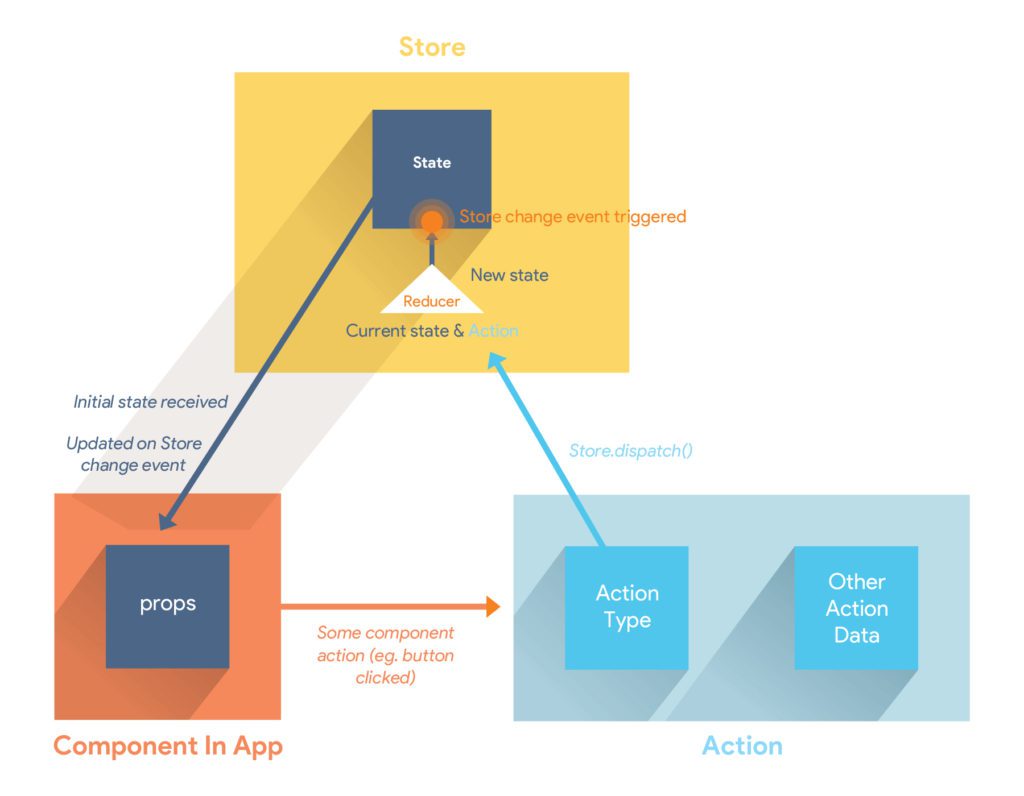
Redux is a predictable state container for JavaScript apps. It helps you write applications that behave consistently, run in different environments (client, server, and native), and are easy to test. On top of that, it provides a great developer experience, such as live code editing combined with a time travelling debugger. It is small (2kB) and has no dependencies. We often use it together with React for the sheer simplicity and ease of use in development.
As we continued to work with different kinds of React projects, we understood that there is no “one size fits all” type of boilerplate template, so in crafting this starter kit, we wanted to give developers the flexibility to modify it according to their needs — for example, using MobX, Relay or some state management library instead of Redux.
Using this starter kit in our own development environments, we were able to save a considerable amount of time and start implementing view and data logics right away rather than scurrying around finding the best available node modules and libraries and configuring them. What would ordinarily take several days can now take just a few hours.
Interested? Great! Here’s how to use the starter kit:
1. Once you clone the repo from react-boilerplate just run npm install & then npm start.
2. The npm scripts are defined in our package.json. You can use them for following:
- npm install: to simply install all the required node modules of project
- npm start: to run webpack bundler(using webpack/dev.config.js) and start project
- npm run styles: to check for indentation & other styling errors.
- npm run eslint: to check for eslint errors.
- npm run build: to generate production version of bundle(using webpack/production.config.js) after performing all the error checks.
- npm install/uninstall : to install/uninstall a specific node module.
Project Modules:
/src folder includes all the code that is required for development.
/src/components contains all the react jsx components.
/src/middleware contains everything you need to setup the API http middleware.
/src/models contains all the redux store files
/src/index.js has all the routes defined for the react project that uses react-router.
/src/store.js contains all the redux store configurations.
/webpack - with this module,  you can configure the development and production environment - adding and configuring API endpoints
This starter kit also contains Redux Forms which contain predefined form components like text fields, select boxes and so on, in forms.js. This helps save a considerable amount of time – particularly for projects which rely on forms a great deal.
Our components are also much easier to reuse since we’ve divided them into two categories: Container and Presentational components. You may also have heard them called Fat and Skinny, Smart and Dumb, Stateful and Pure, Screens and Components, and so on. Although these aren’t all exactly the same, the main idea is similar.
Our Presentational Components:
=>Are concerned with how things look.
=>May contain both presentational and container components** inside, and usually have some DOM markup and styles of their own.
=>Often allow containment via this.props.children.
=>Have no dependencies on the rest of the app, such as Redux actions or stores.
=>Don’t specify how the data is loaded or mutated.
=>Receive data and callbacks exclusively via props.
=>Rarely have their own state (when they do, it’s UI state rather than data).
=>Are written as functional components unless they need state, lifecycle hooks, or performance optimizations.
Examples: AuthLayout.js, MessageBlock.js, errors.js, LoadingComponent.js, Spinner.js, etc.
Snippet of AuthLayout.js:
import React from ‘react’
export default ({children}) => (
<div className="ui centered grid">
<div className="sixteen wide mobile eight wide tablet eight wide computer column">
{children}
  </div>
 </div>
)
Our Container Components:
=>Are concerned with how things work.
=>May contain both presentational and container components** inside but usually don’t have any DOM markup of their own except for some wrapping divs, and never have any styles.
=>Provide the data and behavior to presentational or other container components.
=>Call Redux actions and provide these as callbacks to the presentational components.
=>Are often stateful, as they tend to serve as data sources.
=>Are usually generated using higher order components such as connect() from React Redux, createContainer() from Relay, or Container.create() from Redux Utils, rather than written by hand.
Examples: LoginPage.js, SignUpPage.js, LoginSentPage.js, ApplicationMessages.js, etc.
import React from 'react'
import {connect} from 'react-redux'
import AuthLayout from './AuthLayout'
const LoginSentPage = ({location, dispatch}) => (
 <AuthLayout>
 <div className={'ui top attached message'}>
 <div className="header">Secure Login Key Sent</div>
 </div>
 <div className="ui attached fluid segment">
 <p>Thank You for subscribing.</p>
 </div>
 </AuthLayout>
 )
 export default connect(state => ({}))(LoginSentPage)
With this starter kit, you’ll be able to save hours or even days in your development time, and have an easy-to-use starting point for your React-Redux projects.
Best of Success!


