Electron JS – Lets Build Our First Desktop App Together
Published on 14 Mar 2018
Electron JS – Lets Build Our First Desktop App Together
This is the second part of my previous blog Electron JS – One Platform to Run Them All. I would be diving straight into setting up Electron JS and guiding you to make your first electron application.
Getting Started with Electron JS
For development using Electron, we need to have Node and npm(node package manager) installed. If you don’t have these installed then head over to Node setup to install node on local system. Make sure that node and npm are installed properly on your system by running the following commands in terminal.
node –version
npm –version
Whenever we create a project using npm, we need to provide a package.json file, which has all the details about the project. npm makes it easy for us to set up this file. For setting up development project.
- Fire up terminal/cmd, create a new folder named hello-world and cd into it.
- Now to create the package.json file using npm, use the following.
npm init
- It’ll ask you for some information:
- Just keep pressing enter, and enter your name at the “author name” field.
– Now run the following command to install Electron globally.
$ npm install -g electron-prebuilt
– Once it executes we can check if electron installed correctly by running the following command:
$ electron –version
We have created a package.json file for the project. Now we’ll create our first desktop app using electron.
Create a new file called main.js. Enter the following code in it :
var app = require('app');  // Module to control
application life.
var BrowserWindow = require('browser-window');
// Module to create native browser window.

// Keep a global reference of the window object,
if you don't, the window will
// be closed automatically when the JavaScript
object is garbage collected.
var mainWindow = null;

// Quit when all windows are closed.
app.on('window-all-closed', function() {
   // On OS X it is common for applications and their menu bar
   // to stay active until the user quits explicitly with Cmd + Q
   if (process.platform != 'darwin') {
       app.quit();
   }
});

// This method will be called when Electron has finished
// initialization and is ready to create browser windows.
app.on('ready', function() {
   // Create the browser window.
   mainWindow = new BrowserWindow({width: 900, height: 600});

   // and load the index.html of the app.
   mainWindow.loadURL('file://' + __dirname + '/index.html');

   // Emitted when the window is closed.
   mainWindow.on('closed', function() {
       // Dereference the window object, usually you would store windows
       // in an array if your app supports multi windows, this is the time
       // when you should delete the corresponding element.
       mainWindow = null;
   });
});
* Take a look at what we do in the ‘ready’ method. First we define a browser window and set its initial size. Then, we load the index.html file in it, which works similarly to opening a HTML file in your browser.
Create another file, this time an HTML file called index.html. Enter the following code in it.
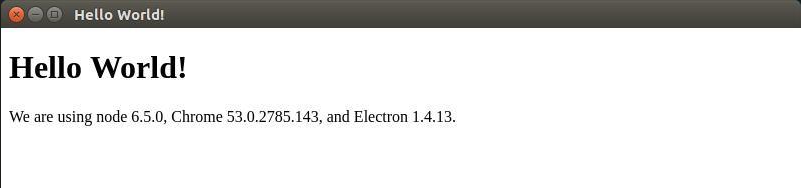
<!DOCTYPE html>
<html>
  <head>
     <meta charset="UTF-8">
     <title>Hello World!</title>
  </head>
  <body>
     <h1>Hello World!</h1>
     We are using node
     <script>document.write(process.versions.node)</script>,
     Chrome
     <script>document.write(process.versions.chrome)</script>,
     and Electron
     <script>document.write(process.versions.electron)</script>.
  </body>
</html>
Run this app using the following command:
$ electron ./main.js
A new window will open up. It’ll look like the following:
Key points:
- We create a new window by creating a new instance of the Browser Window object.
- It takes an object as a single argument, allowing us to define various settings, amongst which the default width and height of the window.
- The window instance has a loadUrl() method, allowing us to load the contents of an actual HTML file in the current window. The HTML file can either be local or remote.
- The window instance has an optional openDevTools() method, allowing us to open an instance of the Chrome Dev Tools in the current window for debugging purposes.
Electron JS – Debugging
Like in any other language debugging is an important part of app development. We have 2 processes, as we discussed in the start ,that run an application. The main process and the renderer process.
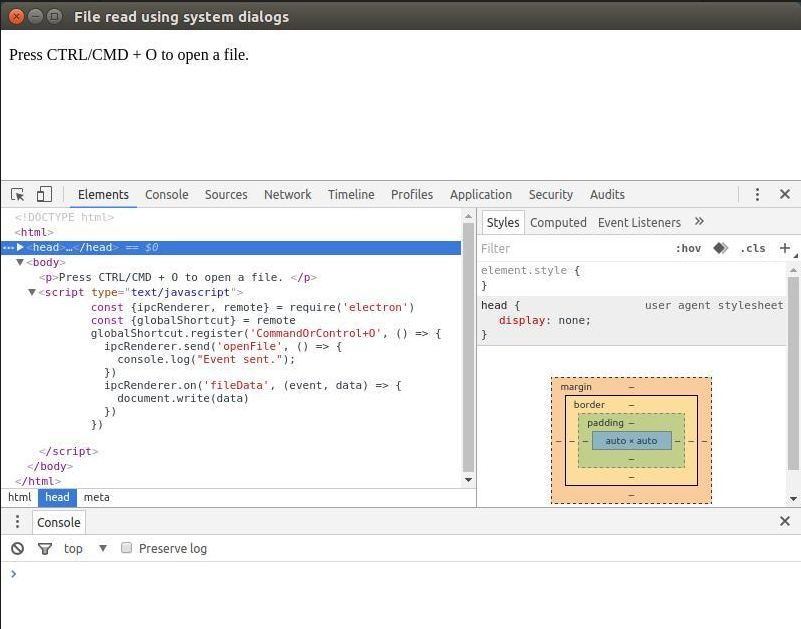
Since the renderer process is the one being executed in a browser window, we can use Chrome Devtools to debug it. To open DevTools use the shortcut “Ctrl+Shift+I” or the <F12> key.
When we open the DevTools, app would look like this:
Debugging the Main Process
The Dev Tools in an Electron browser window can only debug JavaScript that’s executed in that window (i.e. the web pages). To debug JavaScript that’s executed in the main process we will need to use an external debugger and launch Electron with the –debug or –debug-brk switch.
Run the app using the following:
$ electron –debug=5858 ./main.js
Now it needs a debugger that supports the V8 debugger protocol. We could use VSCode or node-inspector for this purpose. For example, let’s set up VSCode for this purpose.
Follow the below steps to set it up:
- Download and install VSCode . Open your Electron project in VSCode.
- Add a file .vscode/launch.json with the following configuration:
   {
    "version": "1.0.0",
    "configurations": [
     {
        "name": "Debug Main Process",
        "type": "node",
        "request": "launch",
        "cwd": "${workspaceRoot}",
        "runtimeExecutable":
        "${workspaceRoot}/node_modules/.bin/electron",
        "program":
        "${workspaceRoot}/main.js"
     }
  ]
}
Note: For Windows, use “${workspaceRoot}/node_modules/.bin/electron.cmd” for runtimeExecutable.
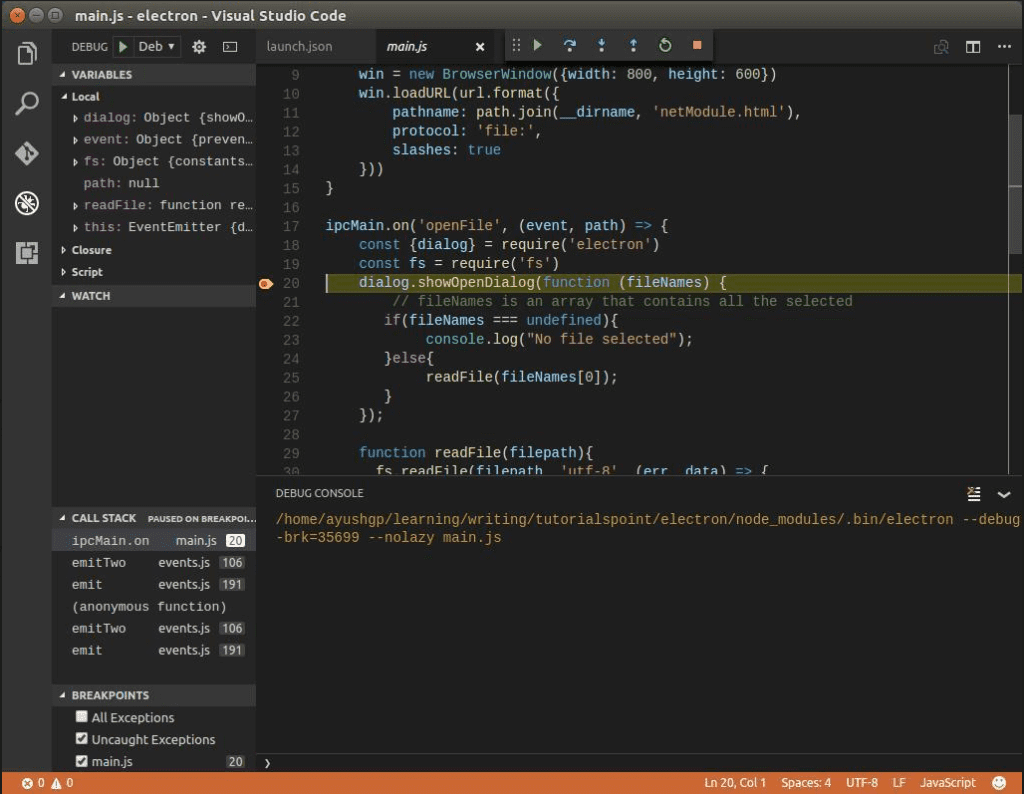
- Set some breakpoints in main.js, and start debugging in the Debug View. When we hit the breakpoints, the screen will look something like this:
The VSCode debugger is very powerful and will help you rectify errors quickly. You also have other options like node-inspector for debugging electron apps.
Electron – Packaging Apps
It’s an important and integral part of the development process of any desktop application.
Since Electron is a cross platform desktop application development framework, packaging and distribution of apps for all the platforms should also be a seamless and effortless experience.
Packaging application for all platforms can be easily done using electron-packager ,
What electron-packager does is, it wraps your app with Electron and generates all platforms for which you’re going to publish. By doing this, It allows us to package and distribute our Electron app with OS-specific bundles (.app, .exe etc) via JS or CLI.
Supported Platforms
Electron Packager is runs on the following host platforms:
- Windows (32/64 bit)
- OS X
- Linux (x86/x86_64)
It generates executables/bundles for the following target platforms:
- Windows (also known as win32, for both 32/64 bit)
- OS X (also known as darwin) / Mac App Store (also known as mas)
- Linux (for x86, x86_64, and armv7l architectures)
Installation
Install the electron packager using:
# for use in npm scripts
$ npm install electron-packager –save-dev
# for use from cli
$ npm install electron-packager -g
Packaging apps
We’ll be seeing how to run the packager from the command line. The basic form of the command is:
electron-packager <location of project> <name of project> <platform> <architecture> <electron version> <optional options>
where:
- location of project is folder where your project is,
- name of project defines the name of your project,
- platform decides for which platforms to build (all to build for Windows, Mac and Linux),
- architecture decides for which architectures to build (x86 or x64, all for both) and
- electron version lets you choose which Electron version to use.
To save time what we can do is, we can add another script to our package.json.
“pack-win”: “electron-packager app/ Clientele –platform=win32 –arch=x64 –out dist/ –overwrite –icon=./app/assets/img/Clientele.ico –prune=true”
And then run the following in CLI:
$ npm run-script package
All done and your first desktop application is ready to be shipped. I hope that you enjoyed this blog, would be looking forward for your comments.
To read more insightful posts, stay tuned!
Related posts

Blockchain
Web Apps
NFT
App Development
The Ultimate Guide to Hiring Blockchain Developers in 2025: Skills, Costs, and Models
15 Apr 2025

App Development
Mobile Apps
Technology
Web Apps
Building Your App? Rust vs Go: A Guide for Business Owners
21 Feb 2024
Let’s talk, no strings attached.
