

Testing Performance of NodeJs App? Try These 3 Proven Tools
Last Updated on: December 1, 2023

Not sure what tools to use for Node.js performance testing of your application? We have crafted a quick guide with tools to help you out!
If you have seen any of Gordon Ramsay’s “kitchen nightmares” TV shows you will understand that when the pressure of a busy service is in full swing, this is where cracks appear and things come apart.
Under pressure orders get missed, misplaced, or start backing up. Chefs make mistakes and maybe under-cook or overcook something. Plates get dropped. The staff gets in each other’s way. Orders get sent back because they’re cold or cancelled because it’s taken so long. And, worst of all, customers can get frustrated, or angry, or get up and leave without paying.
In the software development field, performance testing is just this, conducting proper tests helps to establish the application’s speed, scalability & stability under the workload. Our team of Node.js developers has been trusted by the likes of Grindr, UberConference, and Vyng to help with their performance issues and improve their scalability with increasing traffic on their apps and do Node.JS Performance Testing.

In this blog, we have mentioned the most widely used Performance Testing tools for evaluating web application performance and load stress capacity on applications. These testing tools will assure your application’s performance in high traffic and under extreme stress conditions.
We have also discussed how to set them up, analyze the results and how use Node.js performance testing tools so you can avoid any major fallbacks.
What will you learn?
Load Testing Tools
To start, you are going to need to understand how your web application is performing currently, for that, you will need to answer the following questions:
- How much time does it take to serve a request?
- How many requests can it serve in a given time period?
- How many concurrent requests can it handle?
But obviously, you can’t really ask these questions directly to your application. For this, you will need Node.js performance testing tools called Load Testing Tools. Through these Node.js testing tools, we can put the application under normal and extreme circumstances such as a few user requests in a given span of time VS a huge number of concurrent requests in the same duration to see how the application performs in both cases.
You will find hundreds of tools for performance testing, but let’s take a look at the two most popular NodeJS performance testing tools that can be used to test your node.js application and help to monitor different aspects of the application in order to continuously improve the performance parameters.
Artillery

Written in JavaScript, Artillery is an open-source command-line tool for load testing and smoke testing web applications. It supports testing HTTP, Socket.io, and WebSockets APIs.
Artillery is a straightforward performance testing tool. It is a load generator, which means it sends a lot of requests to the server you specify, very quickly. Unlike other load testing tools that have complicated GUIs, Artillery is a simple CLI (Command Line Interface) tool, making it very easy to use and integrate into any environment. It gives you the min. Max. and median time it took the server to process these requests and gives you a better understanding of how your app will behave at different load times.
For a quick ad-hoc test you can run a command through CLI or you can also create a configuration file that defines your load profile. You tell Artillery which endpoints you want to request, at what rate, for what duration, etc.
How Systango Can Help You?

Installation
> npm install -g artillery
Usage
Once the installation is done. There are 2 ways in which you can define the scenarios and perform Node.js testing as described above. Let’s discuss those:
CLI
For quick NodeJS performance testing, you can use the command-line interface to define and run the scenarios. Execute below command in CLI to get a glimpse of artillery.
> artillery quick --count 10 -n 20 https://localhost:3000
The above command will ask artillery to create 10 virtual users which would send 20 requests each to https://localhost:3000
The output would look something like
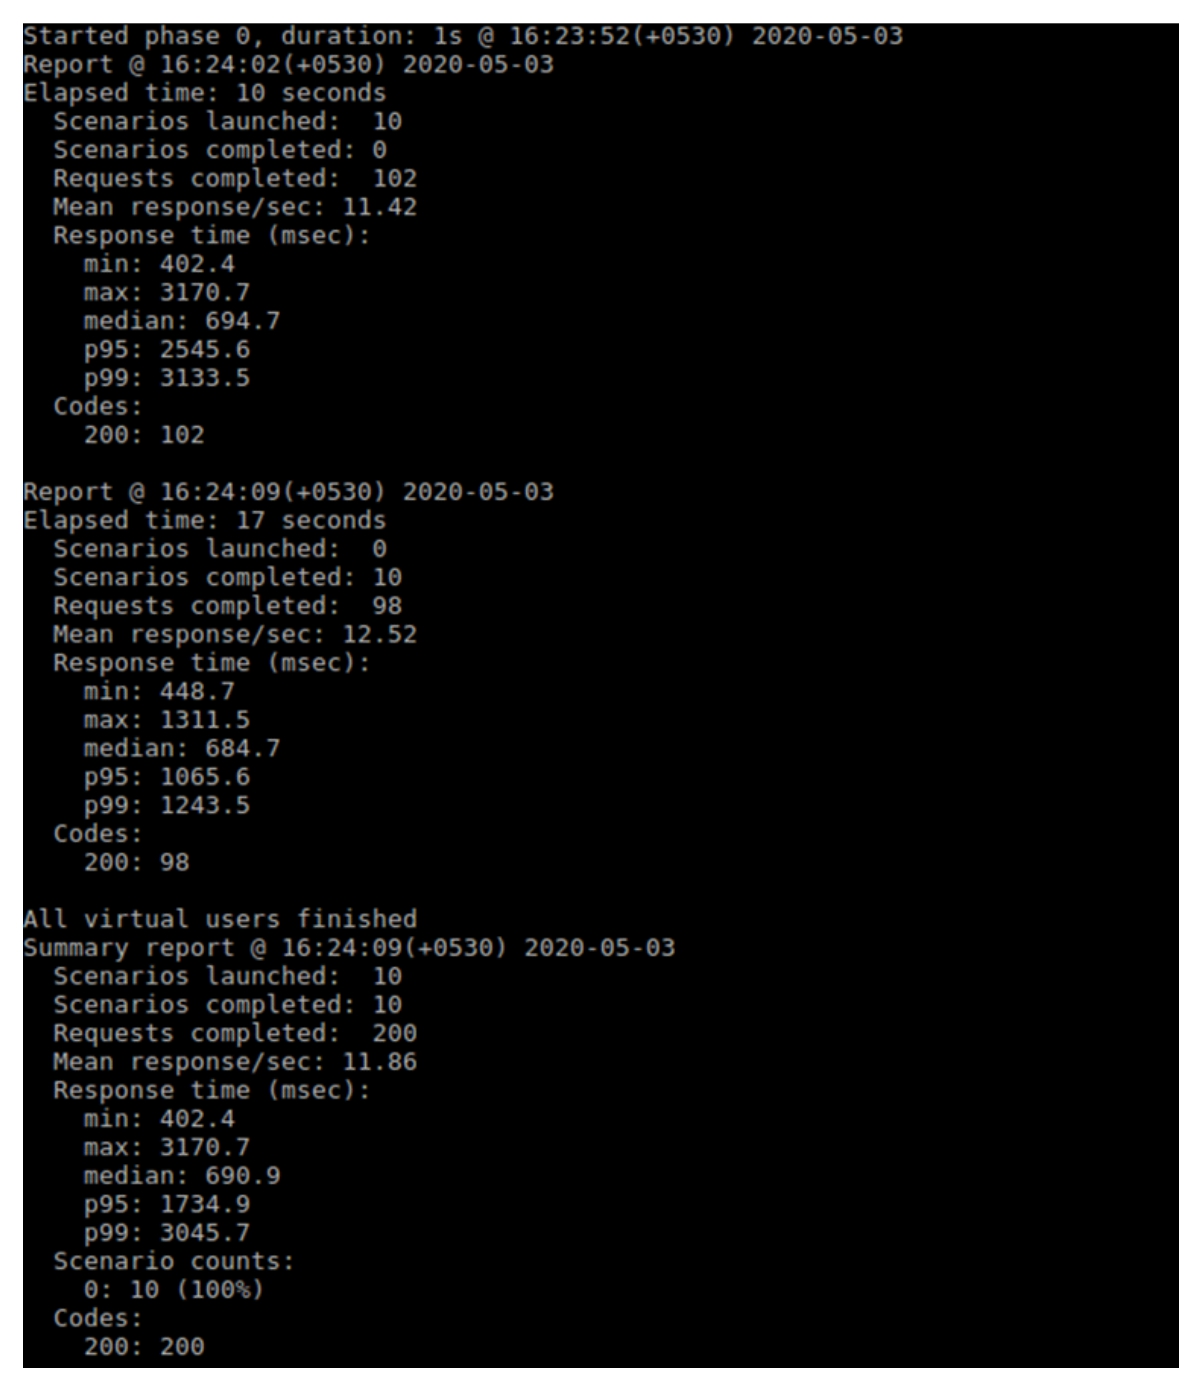
Artillery will print intermediate reports after every 10 secs and then a final aggregate report at the end of the test.
Each report would show the information related to the requests that have been processed and the time taken to complete the requests.
Configuration File
CLI is good for a quick test but for a realistic user behaviour scenario, we need to define some real-life scenarios that users will perform on your site. For this, it would be better to create a .yml configuration file. In this file, we can define different scenarios and different environments where you want those scenarios to be executed for a more aggressive Node.js performance testing. We can also take dynamic variables that can be given using environment variables.
Let’s take a look at an example config file:
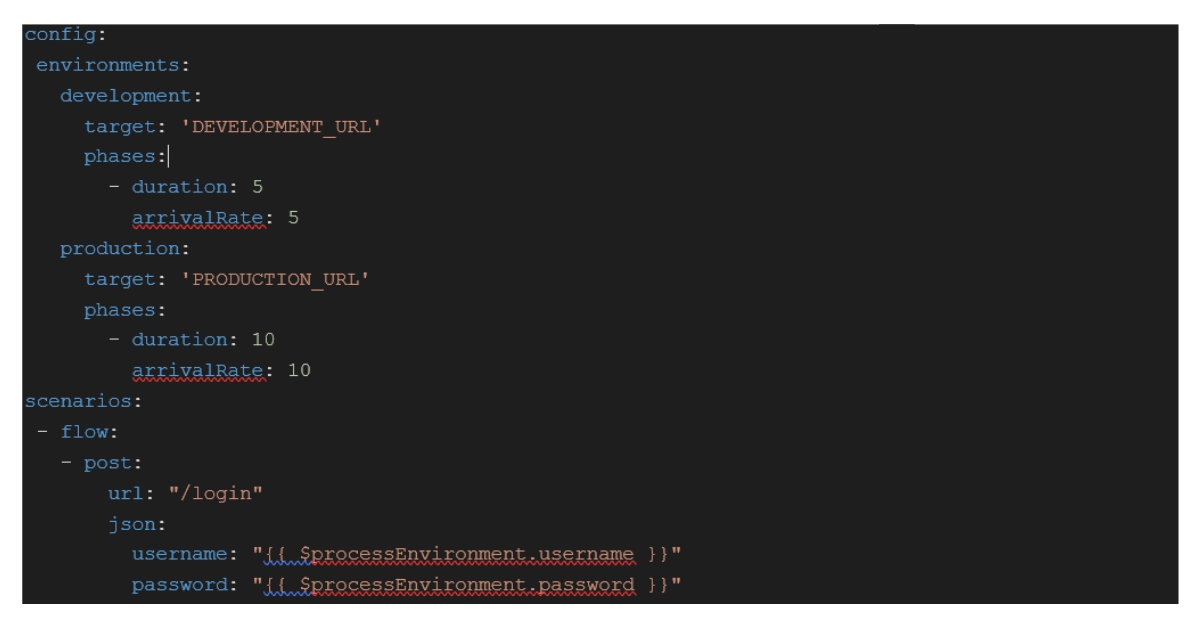
In the above example, we have taken 2 environments development and production with different phases for each and there is a common scenario for both where users can log in to the system. Username and Password come from the environment variables.
In order to run, we will define the 2 environment variables first and then make use of the config. environments property to run for the particular environment.
> export username="user_name"

> export password="************"

> artillery run -e environment_name file_name.yml
You can define many more complex scenarios using this NodeJS performance testing tool to test the application and can also include this to your CI/CD pipeline to automate the testing after every deployment.
Autocannon

Autocannon is another performance testing tool written in node.js which provides the following two reports for the test scenario.
- request latency: time is taken to get the result of the request back to the user
- request volume: the number of requests sent and the number of bytes downloaded
Installation
> npm install -g autocannon
Usage
Like Artillery, Autocannon also provides testing through CLI but like Artillery, Autocannon doesn’t provide an option to create a configuration file. Although, it allows you to configure through the script. Again, let’s look at both these ways:
CLI
Like artillery, you can run the quick test using CLI
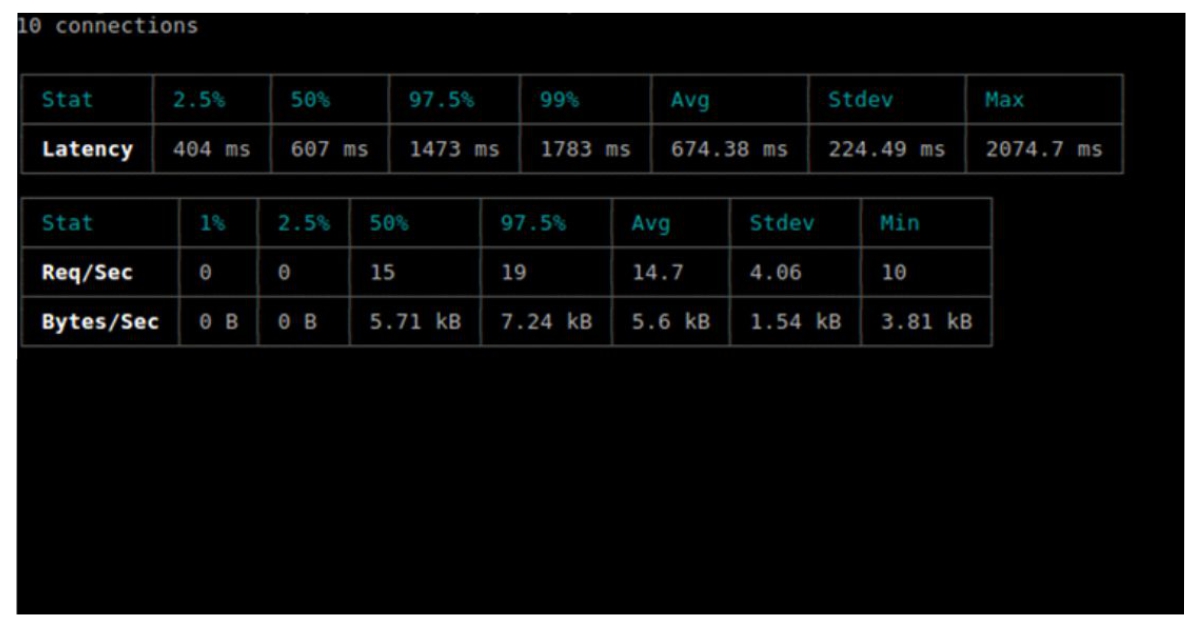
> autocannon -c 10 -d 20 https://localhost:3000
The above command will ask autocannon to make 10 concurrent requests for the duration of 20 secs to https://localhost:3000.
The output would look something like
Script
Unlike artillery in which we create a .yml config file, in the case of autocannon, we can programmatically define the configurations.
> const autocannon = require('autocannon')

> const instance = autocannon({

url: 'http://localhost:3000',

connections: 10,

duration: 20,

requests: [

{

method: 'POST',

path: '/login',

body: JSON.stringify({

username: 'user_name',

password: '*********'

}),

},

{

path: '/profile'

},

]
}, console.log)
We can define multiple requests in the request object to test different endpoints. Likewise, there are a number of other options available to define different scenarios.
How Systango Can Help You?
Autocannon also provides different events like:
- start (emitted when the autocannon is setup),
- tick (emitted every second when autocannon is running a benchmark),
- done (emitted when the autocannon finishes a benchmark)
- error (emitted if there is an error during the setup phase of autocannon) etc.
These events can be used to handle the output or dynamically alter configuration based on the results.
> instance.on('done', handleResults)

function handleResults(result) {

// code goes here

}
Node.js Performance Monitoring Tools
 We have seen how to integrate NodeJS performance testing tools in our application and how to use them to emulate production-like workloads. This will allow us to know how our application is responding and how it will perform in a live environment.
So your app performed poorly, now what? Well, now you need more data to understand why, and then you can improve it. For that, we need some monitoring tools to monitor our app’s data. These tools are often called APMs, and allow you to view critical Node.js performance metrics about your running application.
Node Application Metrics

Node Application Metrics also called appmetrics is a utility that adds interesting metric data to your Node.js application. For NodeJS testing, you get support for:
- CPU metrics
- Memory metrics
- Garbage collection
- Event Loop data
- MySQL, MongoDB, PostgreSQL, OracleDB, and Redis database metrics
- WebSocket monitoring etc.
Appmetrics provides monitoring of the data via an API additionally the data can also be visualized by using the app metrics dashboard. Let’s discuss both of these below.
1. Appmetrics via API
Installation
> npm install appmetrics
Configuration
For Node.js testing, once the installation is done, we would need to require and initialize the appmetrics at the start-up of the application before the required statements for any npm modules we want to monitor. To load appmetrics following configurations are required:
> const appmetrics = require('appmetrics');

> const monitoring = appmetrics.monitor();
Call to monitor() starts the data collection agent making the data available via API. There are a number of objects which we can use to monitor the API, some of them are:
> monitoring.on('initialized', function (env) {

console.log(‘appmetrics initialized’);

});
> monitoring.on('cpu', function (data) {

console.log(‘CPU: ' + data);

});
> monitoring.on('http', function (data) {

console.log(Http: ’ + data);

});
> monitoring.on('mongo', function (data) {

console.log('Mongo: ’ + data);

});
The first event is fired when metrics are ready. The CPU is fired when the CPU monitoring sample is taken. HTTP and Mongo events are fired whenever there is any event related to them.
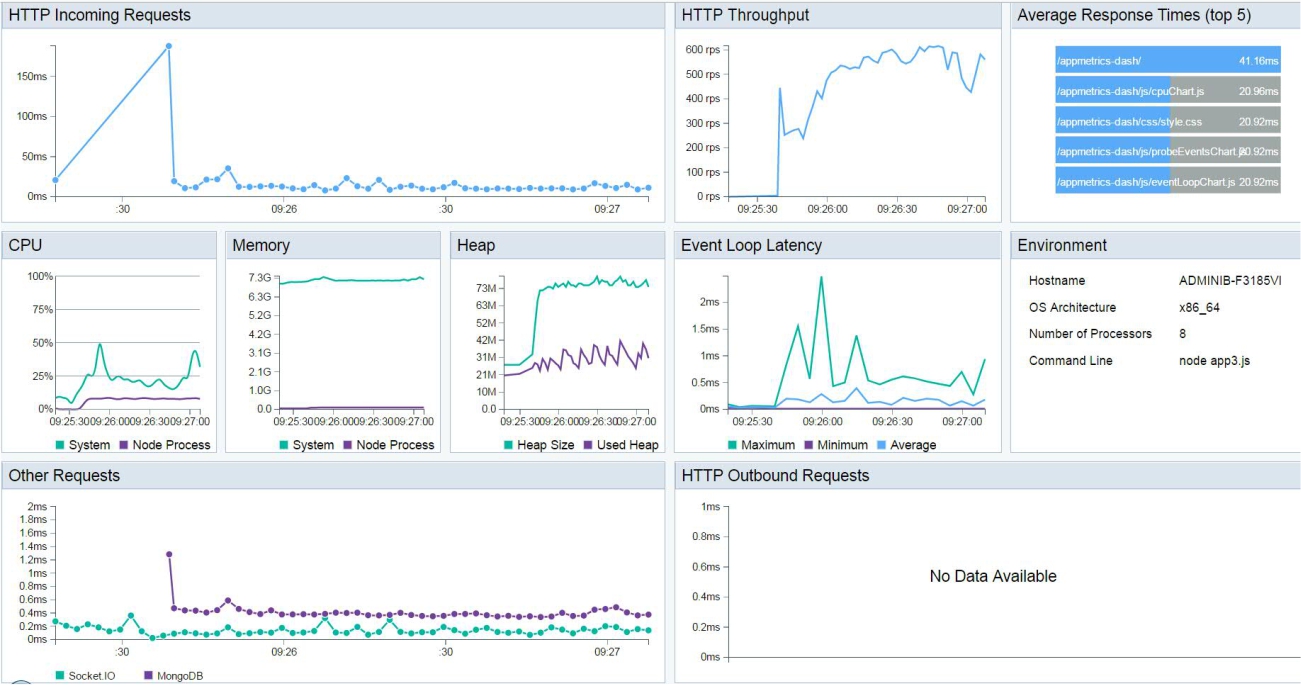
2. Appmetrics Dashboard
There are 2 very simple steps to get up and running for the appmetrics dashboard.
Installation
> npm install appmetrics-dash
Configuration
Add appmetrics-dash support to your existing app by adding the following code:
> require('appmetrics-dash').monitor();
That’s it, now you can monitor your running Node.js application in a web browser at:
> http://:/appmetrics-dash
Wrap Up
We have covered how we can measure the performance of any node.js application by implementing these simple NodeJs performance testing tools and monitoring tools. These would help you gain insights into how your application is performing and which aspect of your app needs improvement.
Hope this article helps you with your NodeJS testing. In case you have any more questions, feel free to comment or Contact Us!


